
 |

|

|

|
 |
"NO", a word very commonly used to describe this layout. No prototype, no complex wiring, no realistic operations, and no sprawling mass of trackwork. So why model it, you ask????? The answer is simple. Pure FUN!!! I built my "giant" railroad, because I enjoy the hobby and watching a detailed miniture train move slowly through the landscape I created. The imperfections I saw through the camera became the natural imperfections you see every day. What might not look right to some, may look realistic to others. Maybe later I'll build a massive basement empire, with DCC control, sprawling mountains, miles apon miles of trackwork, etc, but for now, this 2' x 4' is enough to get to have fun without it being a chore.
|
|
 | Materials used: Two 4' x 8' white beaded styrofoam White glue (carpenter's glue works too) A starter train set Two colors of water-based paint Five heavy books Ground cover (foam from Woodland Scenic's works best Fork from the drawer Bottle of blue nail polish> Molding rubber Various Testor Paints (metallic blue, metallic green, white, and brown) |
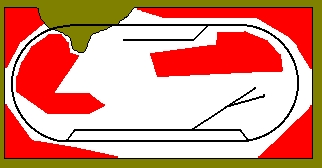
Let's get started. Below are the steps involved for creating the Western Valley. Sizes and techniques can differ, and this is only meant to be informative and not rules to follow. |  |
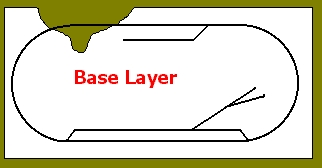 | This is what you should have. The black represents the track. *NOTE: note the cutout lake. |
STEP 2: Lay out the second sheet of styrofoam and mark out roughly the size and shape of your hills, and mountains. This is only the first layer, so it should be the widest part of your intended mountain. Cut with knife and put white glue on the side you want to be the bottom. Set some books on the styrofoam and let dry for at least an hour. Usually by then it holds enough to add the second layer, depending on drying time. Now repeat this step until you have the very top layer formed. NOTE: To create tunnels, mark out where the track will go across the first layer of intended mountain and before gluing down, cut away 3/4" more than the width of the track on either side. It should look like a trench with the track going through it. Let dry overnight. NOTE: At this point, you should have a sheet of styrofoam with layers of styrofoam on top, track, and a cut out lake or river with no bottom yet.
 | 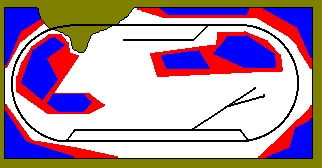 |
| Layer 1 | Layer 2 |

Layer 3
STEP 3: The internet has really fast drying time, but it's probably the next day for you. The next step is to make a mess. Grab a fork, and scrape it across the layers of mountain you just created. If you do it right, this step can be fast, but this step is not for clean freaks because this part is messy. Keep scraping at the layers until there are no straight edges left. Vaccumn up all the little pieces, and your ready to move onto the painting. The color of paint is really your preference, but it MUST be water-based. I used a wheat color on one side, and a medium grey on the other. This gives a little layout distance, but you can do it all one color. Give it a chance to dry. Oh yeah, and if some of the styrofoam still breaks off as your painting, just paint over it, by the time your done with the rest of the steps, this will just look like fallen rocks.
STEP 4: This step involves patience and a sense of balance. Spray the entire mountain with a white glue/water/drop of detergent mixture, and take the ground foam and sprinkle it over the freshly wet areas. Don't put too much on, otherwise you'll take the detail of the popcorn rocks away. Sprinkle lightly, with dark color first and get progressivly lighter with each layer. Spray again with the mixture and let sit to dry. At this point in time we have omitted the lake, but the next step will solve that problem.
STEP 5: Cut a piece of styrofoam that is bigger than the opening of the cutout. Glue the piece underneath the opening and let sit to dry. Find some scrap pieces of styrofoam to stick on the other corners but don't glue them. This is just to allow the layout to sit flat while the glue drys. Let sit overnight. Then go back to STEP 3, and do this to the banks of the "lake"